x
I have had a lot of feedback from my presentation on Deploying Orchard CMS to Windows Azure last month at Boston Orchard CMS. You can find the slides for this presentation at our event page here.
To clarify on some of the demo pieces for people who missed the presentation on Multi-tenancy, this is a nice feature because we can host multiple Orchard sites in a single application domain and have different content and configurations for each site. This is also very nice because if traffic became too heavy we can always horizontally scale the site because we are running in Azure.
Here are the steps to ge Multi-tenancy up and running in Azure. You an follow this tutorial as well which may be better documented, but does not describe the Azure specific Multi-tenancy. http://docs.orchardproject.net/Documentation/Deploying-Orchard-to-Windows-Azure
There are two types of deployments available for Orchard CMS in Azure.
1. For our first example we will use the Cloud Service.
2. A cloud service will run inside a web role and uses a different storage provider for our Database and Media Folder. Installing themes and modules in production is not supported.
3. You will want to download the Orchard source code from Codeplex. You can do a new pull request or download the zip file.
4. Once you have the source code you can then run ClickToBuildAzurePackage.cmd from the command line as an Administrator.
5. This will build your package that is needed to deploy to Azure.
6. You will need a Windows Azure account that allows you to deploy a Web Role and also SQL Azure for your databse.
7. After your build is complete, modify the csfcg file with your Azure specific configurations.
8. Publish a new build to Orchard.
9. Link up your Orchard site to your SQL Azure instance.
10. Go to your Azure portal :

11. Verify your cloud service is up and running, for example : Cloud Service Boston
12. Login to your site and enable multi-tenancy module. (As a note, you should normally not install modules in production on Azure. Tthey will be there after a role restarts. You should always add the module in your dev environment and to your project, and then deploy again. The multi-tenancy module should come with the code base anyways.
13. Browse to the new Dashboard item Tenants.
14. You will need to add a new tenant via the Add menu option. (Yours will not have an entry yet.)

15. Because Windows Azure issues you a CNAME address like http://orchardcmsboston.cloudapp.net , you will need a DNS service that supports wildcard CNAMES if you want to get routing like http://orchardcmsseattle.orchardcmsboston.cloudapp.net to work. In our case Orchard saves us by allowing us to setup our tenant with a url prefix. Our address will be http://orchardcmsboston.cloudapp.net/orchardcmsseattle.

16. Enter the tenant name in the URL Prefix box and the windows azure address for your service in the host box. Select Use Built In Storage SQLCE. Click Save.
17. You will now see your tenant added, and you can click the Set Up link to begin working with your website at http://orchardcmsboston.cloudapp.net/orchardcmsseattle.
18. Your original site is your tenant landlord and you can being adding more and more tenants!
1. Windows Azure websites can be spun up in the cloud and multi-tenancy can be enabled pretty fast.
2. Windows Azure websites are basically setup on a shared server with other users and you own your own network storage for your site.
3. For you to enable multi-tenancy you will need to go into your Windows Azure websites account and move your Orchard site from a Shared instance to a Reserved instance. This will allow you to enter CNAMES for your various site tenants. You do this under the Configuration tab for your website in the Windows Azure portal. You will then see a section labeled domains appear on that screen for you to enter your two tenant addresses.

4. Login to your Windows Azure website and enable multi-tenancy.
5. Browse to Tenants administration item and you should see a list of tenants. (Yours will only have the default tenant)
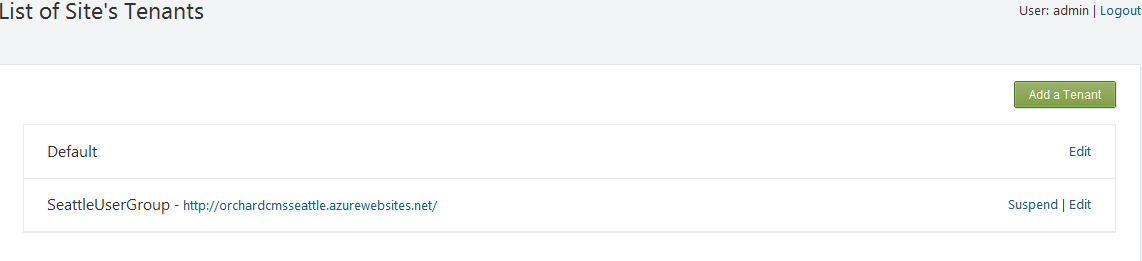
6. You will now add a new Tenant via the menu.
7. Enter your new host for your site : orchardcmsseattle.azurewebsites.net
8. Use SQLCE as your data source.
9. Click Save.
10. You will now have your two tenants, who will answer at http://orchardcmsboston.azurewebsites.net and http://orchardcmsseattle.azurewebsites.net
11. When you hit your new tenant, you can setup your admin account, and the original site will be the tenant landlord.
12. You should be all set now!
About the Author:
Arra Derderian serves as the President and as a Lead Technical Architect for Cloud Construct. As a founder at Cloud Construct, Arra is involved in all levels of the business from new project engagements, project planning, and development.
He also serves as the founder of the Boston Orchard CMS User Group and is a member of the Windows Azure Insiders group.
Arra graduated from Northeastern University School with a Bachelor of Science degree in Computer Science.


